Showing posts with label home decor. Show all posts

May 24, 2012

Recycle Craft: Reclaimed Floor Tile Trivets

Last weekend we here at Sine Metu Designs sponsored a free make-and-take demo at the 4th annual EcoChic Craftacular which featured local artists and artisans who have an eco-friendly spin to their art, crafts, and business practices.  The event is sponsored by Etsy Team Columbus, a collaboration of local indie artists, and of which I'm proud to be a member!  The Team worked very hard to bring the community this fantastic event and it was a huge success:  raising $1000 for the Whetstone Community Center, $250 for two local animal shelters, ADOPT Pet Rescue and Colony Cats and Dogs, and $100 for a local Arts foundation, all serving Columbus-area and Central Ohio.


In the spirit of being eco-friendly, we chose an arts & craft project that made use of reclaimed building materials--which are often in ready supply this time of year as folks get to work with home renovation projects. The reclaimed tile we used I found for free on FreeCycle, which I continue to mention often because it's such a great recycling resource.  

We transformed reclaimed ceramic floor tile (ours are 9-inch by 9-inch) into artsy trivets in a few easy steps, then showed all who cared to learn how to do the same; then we went wild with the enamel paints and produced some functional masterpieces!


Supplies:  Reclaimed tile, cork or felt, spray adhesive, thin quick-tack glue such as super glue or jewelry glue, wooden furniture buttons (optional), enamel acrylic paint for ceramic or "patio" grade acrylic and brushes, Sharpie or permanent marker (optional) and clear spay sealant (optional, but recommended).

First, we removed as much grout as possible from the tiles, using a pair of channel lock-style pliers to remove the line of grout along the edges.  The way these pliers "bite" provide a lot of torque, and it's very easy to snap the grout right off the edge, whereas it was impossible to do so with the bare hand.  Thanks to my hubby for always knowing which tool to use!

Next, I trimmed a pice of cork to the size of the tile.  I purchased a roll of thin cork with a self-adhesive sticker-back at Hobby Lobby for less than $5 and it was enough to make more than a half dozen trivets and several coasters.  If preferred, simple craft felt can be used and adhered to the back with spray adhesive.

To add "feet" to the trivet (optional) I used a thin layer of jewelry glue to adhere round-top wooden furniture buttons to the corners of my tile after I attached my cork.  You can find wooden furniture buttons in the woodworking aisle of craft stores such as Hobby Lobby or at the hardware store--they are used to cover cam-screw holes and are inexpensive.  I purchased a pack of 30 for $1.47 at Hobby Lobby.

Once the feet have dried, you can flip over and begin to paint! Because of the sealant glaze, I recommend ceramic paint or "patio" grade acrylic paint as it's more permanent than general-purpose craft paint.  If you plan to use the tile as a garden marker or step stone, or as an actual trivet for hot pots and pans, you want a more durable finish to take weathering and scratching.  If the tile is strictly decorative, it likely doesn't matter.

Get your inspiration and plan your painting.  If using enamel, you can't just "wipe-off" if you mess up, so draw carefully.  I outlined my images in Sharpie.  A couple layers of paint will cover the marker, or you can use permanent marker to add fine details over the dry painting.

With enamel, build your painting in layers. You can add light colors over dark colors if you let the bottom layer dry first.  It is better to apply two coats of thin layers to build up blocks of color than to try to glob on one thick coat.  You can also paint the sides of the tile for a more finished look.

When the paint is dry and you're finished with your design, spray with a clear glaze or sealant, let dry, and repeat.

Other ideas:  Make a bold geometric print by spraying with a textured spray paint (pictured, hammered copper) and paint acrylic lines in a complementary color when dry (I used cobalt blue enamel).

Make a chalk board server and tell your guests exactly what they're eating by painting several layers of chalkboard paint over the tile.

Let your kid go nuts with the paint for a recycled art experience!

Try some garden tile markers, like the below "Avi & Daddy's Garden" we made.


May 9, 2012

Vase rehab DIY: Blah to Yay!

I have often mention the joys of sprucing up some freebies:

*  Those oddball items you keep hanging onto but live in the depths of your closet or under your sink because you don't actually like them but feel bad about throwing them out because they're still useful.

* Thrift store or yard sale finds with potential

* Freecycle (freecycle.org) freebies

I have acquired a small collection of glass vases from Freecycle.  My husband's Urban Garden Paradise includes a wildflower cutting planter box, so in preparation for some fresh cut bouquets, I have been seeking out some containers.  I also have decided faux flowers are not necessarily relegated to the status of Mrs. Havisham, and can be done in style with punchy colors or romantically with vintage hues.  I've worked in both styles to various rooms:  vivid and playful daisies in the living room, and soft and romantic classics in the bedroom.

So my vase collection necessarily needs to grow from 1-2 to several.  But who wants to spend money on vases when they're so abundantly found second hand for free or cheap?  That's not to say I appreciate the style of those castoffs, so that's where a little creativity comes into play.  I've been itching to try some new techniques and rehab these either blah or dated vases, and here is my first endeavor.

Perfect for faux flowers, interior-painted vases can cover up internal ripples (as in my example) and leave plenty of room for a punchy embellishment on the exterior.  Check out the easy DIY below!

Witness my plain rippled glass freebie.  I'm not a fan of rippled glass vases.  I'm sure it's appropriate somewhere, but I don't care for it.  Plus with faux flowers, often the stems are not very attractive, so a translucent vase can subtract from the decorative effect.


(Right)
1.  Pour a water-resistant paint into the vase, such as latex paint or "patio" or outdoor acrylic.  I went with a Clark and Kensington Flat Enamel Paint and Primer in One in a Mediterranean teal that I got (for free!) from Ace Hardware.  It had wonderful coverage.

2. Gently roll the vase around until the paint has covered the full interior.  Then pour the excess back into the paint can.

3.  Let the vase sit upside down over some newsprint to drain the slower excess from the interior, for about an hour or so.  Don't let it sit so long the paint starts to dry and the newsprint peels off.  If this does happen, just scratch off the paper from the rim and touch up with some of the wet excess pooling on the newsprint.

4.  Turn back over right side up, and allow to dry, several hours or overnight.

5.  (left) Once dry, add your front embellishment with "puffy" paint or fabric paint (I used Tulip fabric paint in white).  If you make a mistake, or don't like it, just wipe clean with a damp paper towel, dry the vase, and start over.

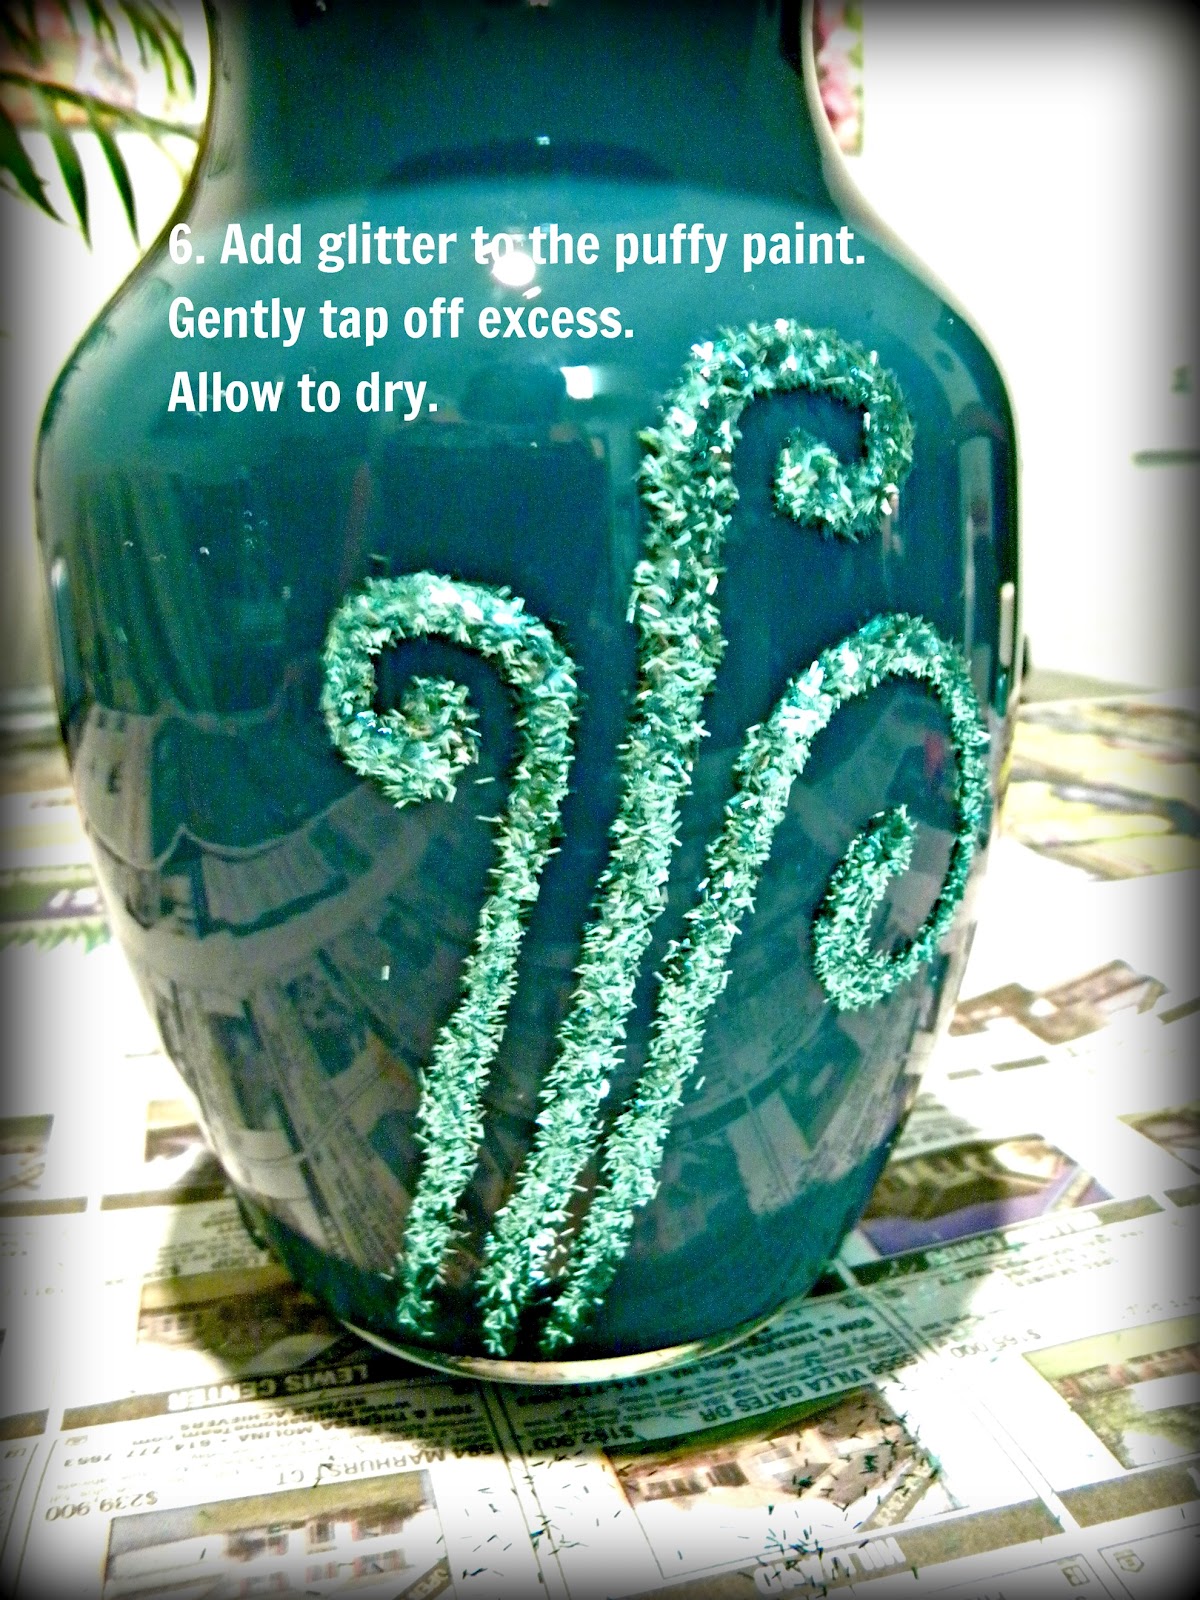
6.  Add glitter, gently tap off excess.

I started with this dot design in the puffy paint, but discovered it didn't work too well with the glitter I used.  I ended up sticking my fingers in it and disrupting several "dots" so I scrapped the whole design by wiping it off with a paper towel while it was still wet.  My simple three swirl lines (next photo) replaced it.

The glitter I used was the "tinsel" style which is little strands of flat strips of glitter instead of the regular tiny square pieces.  It has a nice, unexpected textural effect. (Martha Stewart tinsel glitter in Feldspar.)

Finally, add your flowers!  Faux flowers would work best at this stage, although you could spray the inside with a clear waterproof sealant if you wanted to be able to use fresh flowers.

Now you can see that the teal blends in with my decor!  I used a monochromatic palette but some other fun combos could be done with complementary colors such as a violet or plum interior and yellow or gold glittered exterior, or cobalt interior with orange or topaz glitter.  You could make your outer embellishment as simple or plain as desired.  Use your imagination!


November 5, 2011

Wall hanging project with freebie 4X6 prints

If you find yourself contemplating the irony of taking a LOT of photos, but not having too many in actual physical hold-in-your-hands prints, you can clear out your digital backlog pretty much for free by taking advantage of coupon codes for free 4X6's that photo services offer very frequently.  I mean really frequently.  As in, I've received 105 4X6 prints from Walgreens alone this month! You can find freebie codes online (try google searching them), from other bloggers (I like the Freebie Junkie, most of her posts actually work), and by creating an account with a couple photo services like Walgreens, Target, or CVS, and letting them email you special offers.  Today Walgreens emailed me codes for 15 free prints (free4x6) AND a free desktop calendar (freeforu) (only good for today, Nov, 5th).

Unfortunately, the quality of some of these services is less than stellar.  I've printed better-quality photos from my photo printer on photo paper, but that is quite costly.  Finding and using freebie codes is a good way to test out a particular service before you actually spend money there.  It seems like some companies try to auto-enhance your photos for you, which is not a good thing if you digitally edit your photos yourself.  If your colors are already bright and pretty in your digital file, the generically-applied "auto-enhance" treatment makes them look almost neon, and sometimes downright garish.  Photos you've edited to be sepia or black & white, in my opinion, come out the best.

You may also want to manually crop your images to the size you'll be ordering (such as to 4X6) because if their computer does it, you get some random results (heads partially chopped off, etc.) depending on where they auto-center the image.  Walgreens offers a "digital" size that's slightly smaller than 4X6 where it fits the whole image to the space, instead of cropping some away, but most just center and chop.  Unfortunately, it auto-recognizes which files it things are from a digital camera and offers to do this just for those.  ALL of my photos come from a digital camera, but it only has recognized a few.

Be wary of the services that let you pull directly from Facebook.  Yes, that's super quick and convenient, but the images have been compressed in FB, and you'll get some grainy, fuzzy, inferior prints (some will work, but most will be 'blah' at best).  If you've lost some of your photos on your hard drive that you have on Facebook, you can select "download" from FB when you view the image, and then if using windows, there will be a feature to edit in Picasa (a free program I use for most of my quick & easy edits) where you can save in higher quality to your computer.

The bottom line: you'll have to experiment A LOT with settings -on your end and by learning the idiosyncrasies of each service before you can get reliably good prints, which is why it's great to get them for free--less disappointing when they don't turn out like your perfectly-edited digital file.

So your stock of freebie photos is growing, now what?  I sorted mine into the good, the ok, and the trash pile.    With the ok photo's, I've chopped these up to fill all the little photo frames we've accumulated:  oddball sized frames we've filled with family photos for our 3 year old's room, even a couple Spongebob Burger King kiddie meal refrigerator-magnet photo frames.  You get the idea--Frames you wouldn't waste your best photo prints on.  Collages or other crafting uses for these prints would be another good way to put these "ok" quality prints to use--just check out Pinterest for more ideas than you can hope to accomplish!

I just made this little project with some of my freebie 4X6 prints that came out quite nicely (all sepia).  I have quite a collection of nature photographs I've taken at the various Columbus, OH Metro Parks this year--mostly macro shots of insects, flowers, seeds, mushrooms, moss, or anything else of textural interest.  My husband and I picked out 15 of our favorite, and I used them to create this wall hanging.

Supplies for my model:  36" square dowel rod, painted with acrylic, I used "metallic espresso," a number of photos which appear aesthetically pleasing together,  the same number of 3X3 sticker-backed card stock squares in neutrals (scrapbooking supply), three 36" lengths of 2"-wide ribbon, three flat-headed thumb tacks, ruler, 2 brad nails, hammer, level, painter's tape.

I spent a considerable amount of time deciding what photo would go where--being mindful of many aspects: orientation (vertical or landscape), busy-ness or pattern (some have many details throughout the whole photo, some were more simple), subject (I used all nature prints, but of these some were insects, butterflies, flowers, etc.), and coloration (some of my freebie 4X6s had printed with more yellow hue to the sepia than others), and anything else that affects how the eye perceives your photos as they lie next to each other.  Keep in mind where your eye will see the installation first (depends on where & how high you plan to hang it) and place your very best or favorites there.  This is more difficult than it seems:  not only must you be aware of how a particular photo looks, but how it looks above/below/beside another, AND how the whole group looks!

When you finally figure the above out, I recommend marking their position on the back.  I used a simple coordinate system (e.g. 2,5 for row 2, 5th photo) so you don't have to try to remember your set-up once you stumble on arrangement perfection.

I hand-folded the scrapbooking cardstock stickers into mounts which just showed at the top of the photos, but you could omit this, or mat them all, or whatever you like.


I evenly spaced the ribbon strands, tacked to the back of the dowel with a flat-head thumb tack, let the ribbon wrap around to the front of the dowel, and secured the photos with painter's tape to the ribbon, also evenly spaced.

You could do a horizontal ribbon & clothesline version, whatever you like!