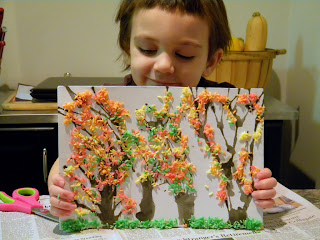
Fall is my favorite season, and having the extra time at home this year, the beautiful changing of the leaves has put me in a decidedly crafty mood. Avi, who will be coming upon 4 years old in a couple months is incessantly interested in whatever project I've got going on. She loves to paint, cut and paste, and of course, play-dough!
This project was great because it involved her at various stages of prepping and creating, and thus there was plenty to keep her hands busy.
I posted the process on Facebook, and immediately got comments about it being a must-try for other moms and their kiddos, so I thought I'd share it for all.
You'll need: dry plain white rice, food coloring (for the fall-theme, we used green, red, yellow, and orange), ziplock bag, water, some containers (or I used a muffin tin), cardboard (I recycled an empty cereal box), construction paper, white school glue, watercolor, paint brush, straw, and newspapers or some table covering.
Step 1: Dye the rice. Use about 6 drops of food coloring and 1 teaspoon of water per about a half cup of white rice. Mix it up in a ziplock bag until the color is evenly distributed. Once I dumped out the rice into the muffin tins, I rinsed out and re-used the baggie, but you could use separate ones.
2. Let the rice dry. It should only be slightly damp from the small amount of water, and in the tins it took about a half hour to be dry to the touch.
3. Meanwhile, prep your scene surface. It will need to be pretty heavy since you will be gluing rice onto it later, but will need to be paper in order for the watercolor part to work (shown above). I recycled an empty cereal box, cut a panel out and covered it with white drawing paper using a glue stick.
4. Blown water color trees: make a watery mix of trunk-colored watercolor. Mine come in tubes, but you could adapt for tray watercolors. Using a brush, dab a tiny puddle onto the bottom of the page and let your child blow the droplet up the page with a drinking straw. This will make random tree-like branches, which is a neat treat to watch as your child figures this out. Stand by to add more paint droplets where needed, and encourage your child to blow in different directions.
5. Paint in the trunks with a brush.
6. Dab white school glue around the tree branches however you/your child likes. We also made a line of glue at the bottom just for green to be grass. Sprinkle on the rice randomly over all the glue until covered.
(This was Avi's favorite part!)
7. When the glue is dry (about half hour depending on how thickly it was applied), tap the excess rice off the page. Viola! Pretty falling leaves rice scene!
If you were smart and covered your surface with newspaper, you can just wad it all up and sack it in the trash. No big mess here!
Hope you enjoy this little project--my kiddo sure did!


No comments:
Post a Comment